Using the MEDIALecture Classroom Installer (MSI)
Overview
MEDIALecture is launched via clicking the RED record button on the front end MEDIAL site, if the account logged in has permission to use MEDIALecture. When the button is clicked for the first time, the MEDIALecture application will be downloaded, and will require installation. The second time the button is clicked after installation will launch the MEDIALecture application.
If a custom installation is required, whereby options can be chosen such as where MEDIALecture recordings are stored on the client PC prior to being uploaded, the MEDIALecture Classroom installer can be used. This installer allows the client to be rolled out to multiple computers using an MSI installer and using a combination of switches to set the necessary preferences.
To obtain the latest version of the MEDIALecture Classroom installer please contact the Support Team at support@medial.com
Usage
1. Changing Installation directory - msiexec /i <msi filename> INSTALLFOLDER="<Directory where it needs to be installed>"
Example: msiexec /i Medial.Lecture.Setup.msii.msi INSTALLFOLDER="C:\test\"
If INSTALLFOLDER is not specified then it should install in program files as usual.
2. Desktop Shortcut via Command Line - Provide INSTALLDESKTOPSHORTCUT=true to enforce desktop shortcut
Example: msiexec /i Medial.Lecture.Setup.msi INSTALLDESKTOPSHORTCUT=true
3. Quiet Installs - All the above should work with quiet installs
Example: msiexec /i Medial.Lecture.Setup.msi /quiet /qn /norestart
4. Quiet Uninstalls - Use /x instead of /i for uninstalls
5. To install with Roaming - USEROAMING=true
6. To specify the media location - MEDIALOCATION=“C:\xyz”
7. To enable record system audio - RECORDSYSTEMAUDIO=True
8. To delete media after upload - DELETEMEDIAAFTERUPLOAD=True
9. To set screen resolution - SCREENRECORDINGRESOLUTION=1080
GUI Installer
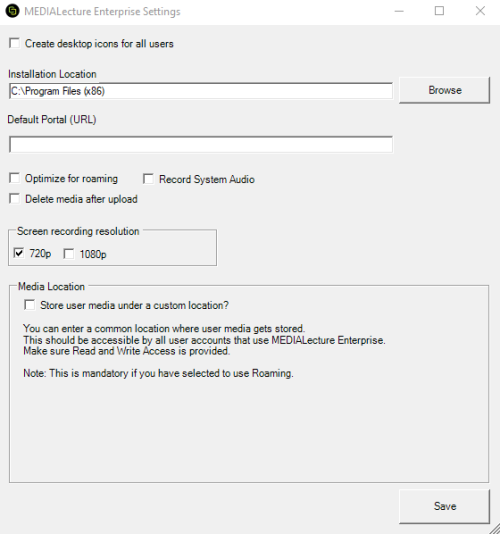
The MSI installer can also be run by double-clicking it which will open the GUI.
The same options are available when using the GUI installer. If the ‘Create desktop icons for all users’ check box is checked, set the path to the MEDIAL portal in the ‘Default Portal (URL)’ field, including the http or https prefix.
If the ‘Optimize for roaming’ box is checked, check the ‘Store user media under a custom location?’ box and set the path to the location where users’ recordings should be stored.

